Fast and Reliable Ways to Convert Logo for BAi Mirror Embroidery Machine
Introduction: Help Your Machine Help You
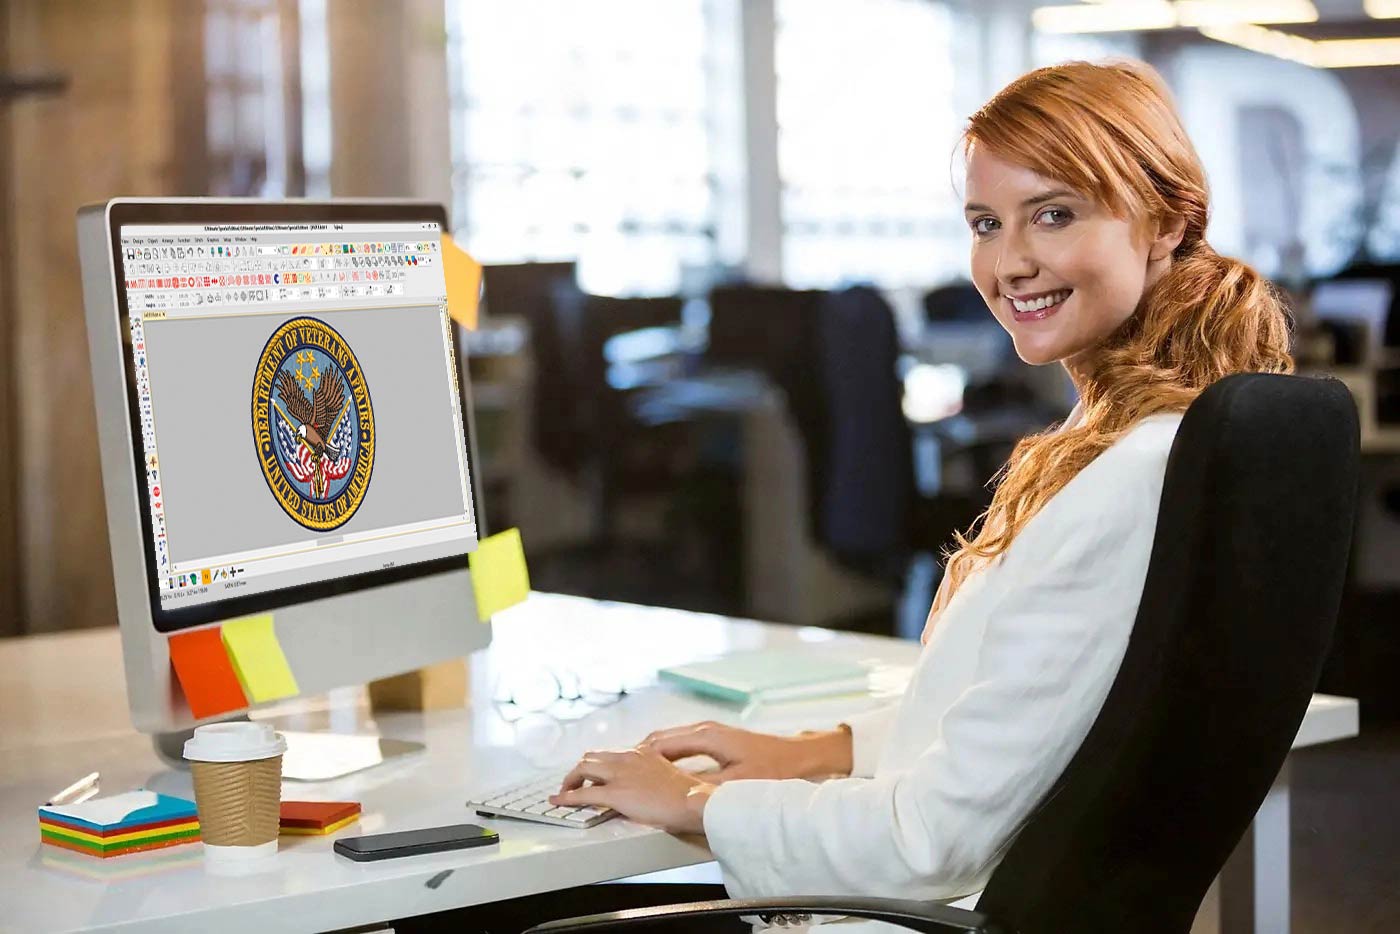
You just unboxed that shiny BAi Mirror machine. Fifteen needles, a gorgeous touchscreen, and the promise of professional embroidery at your fingertips. You load up a logo file. Nothing happens. Or worse, the machine starts clunking and jamming. What went wrong? You tried to feed it a regular picture file. A JPEG or PNG means nothing to your BAi. What it desperately needs is a proper stitch file. That is why you need to Convert Logo for BAi Mirror Embroidery Machine before you even thread a needle.
I remember staring at my own machine, holding a USB stick full of “useless” JPEGs, feeling pretty foolish. But here is the truth: the conversion process is not scary once you know the rules. Your BAi speaks a specific language of stitches, and this guide teaches you how to translate your logo into that language. We cover the exact file formats you need, the brutal truth about auto-digitizing, and a reliable workflow that saves you from wasting shirts and patience.
Your BAi Only Speaks Two Languages
Let us get this straight right now. Your BAi Mirror machine is a hard worker, but it is not a mind reader. It only understands two file formats: DST and DSB .
DST is the universal language of the embroidery world. Originally designed for Tajima commercial machines, it has become the standard everywhere. Every digitizer knows it. Every major machine reads it. For your BAi, DST is the safest and most reliable choice .
DSB is another option, originally from Barudan machines. Your BAi supports it too, but it is less common. Stick with DST unless you have a specific reason to use DSB .
Here is what your BAi cannot read: JPEG, PNG, PDF, BMP, or any other standard image format . Those files store pixels and colors for screens, not stitch commands for needles. Loading them directly gives you error messages or a very confused machine.
| File Format | What It Does | BAi Support | Best For |
|---|---|---|---|
| DST | Universal stitch file with precise commands | Yes | Most designs |
| DSB | Barudan-format stitch file | Yes | Backup option |
| JPG/PNG/PDF | Image files (no stitch data) | No | Never use these |
The Brutal Truth About Auto-Digitizing
Every beginner asks the same question. “Can I just use that auto-digitize button in my software?”
Here is my honest answer. Auto-digitizing makes guesses. Sometimes those guesses work for a very simple logo with big, bold shapes and solid colors. Most of the time, the results look terrible .
The letters come out blobby because the software does not understand letter anatomy. The edges look jagged because it guesses where to place stitches. The density goes wrong, causing thread breaks or fabric puckering. You load the file, press start, and spend more time fixing problems than actually embroidering .
I am not saying auto-digitizing has no use. It can give you a rough starting point for a very simple design. But for client work or anything you actually care about, do not rely on it. You will waste thread, fabric, and time.
Your Two Real Options: DIY or Outsource
So how do you get a good DST file? You have two solid paths forward.
Option one is learning to digitize yourself. You need professional software like Wilcom, Hatch, or Pulse. You need to study stitch types, densities, underlay, pull compensation, and fabric behavior. Professional digitizers spend years getting good at this. It is absolutely doable if you have the patience, but expect a serious learning curve .
Option two is using a professional digitizing service. This is what most beginners do, and honestly, what many experienced shops do too. You send your logo to a service, they send back a perfect DST file for your BAi. No software to buy. No months of practice. No frustration .
I personally recommend the hybrid approach. Start with a service for your client work while learning digitizing on the side for your own projects. This way you are never under pressure to deliver a perfect file before you are ready.
What to Look For in a Great Conversion
Whether you digitize yourself or hire a pro, a quality conversion has specific ingredients.
Correct sizing matters enormously. A left chest logo typically runs 3 to 4 inches wide. A cap design needs different dimensions. Make sure your digitizer knows the exact final size before they start .
Fabric-appropriate settings separate amateurs from pros. The same logo needs completely different digitizing for a stretchy polo shirt versus a structured cap versus a fleece jacket. A good digitizer asks about your fabric. If they do not, find someone else .
Clean stitch types mean using satin stitches for outlines and small text, fill stitches for large areas, and running stitches for fine details. Each stitch type serves a specific purpose .
Proper underlay is the hidden hero. These foundation stitches stabilise your fabric and prevent puckering. You cannot see them in the final design, but you will absolutely notice if they are missing .
Pull compensation fixes the way corners pull inward during stitching. Without it, your perfect circle becomes an oval and your sharp corners round off. A good digitizer adds just enough compensation to counteract the natural pull of the thread .
What Information to Give Your Digitizer
If you outsource the work, help them help you. Here is what you need to provide.
Send the logo file itself. Vector formats like AI, EPS, or SVG work best. If you only have raster images, send the largest, highest-resolution PNG you have .
Specify the exact finished size in inches. Do not say “medium size.” Say “3.5 inches wide.”
Tell them the garment type and fabric. “Polo shirt” or “structured cap” or “fleece jacket.” Each one changes the digitizing approach.
Mention any special instructions like specific thread colors or unusual placement.
The more information you give, the better your file will be. Digitizers are skilled, but they are not mind readers .
Never Skip the Test Stitch
Here is the step every beginner wants to ignore. Before you stitch that big order of fifty shirts, stitch one test.
Use the actual fabric you will be using. Same stabilizer. Same machine settings. Run the design and examine it carefully .
Check for puckering. Check that small text is readable. Check that colours registered properly. Check that the size looks right on the actual garment.
If anything looks off, now is the time to fix it. Take photos and send them to your digitizer. Most professional services include free revisions for exactly this reason. They want the file to work perfectly on your machine with your materials .
This single step saves more money and frustration than anything else. A test sew takes ten minutes and costs a scrap of fabric. A failed production run costs shirts, thread, and your reputation. Do not skip it.
Common Beginner Mistakes to Avoid
Let me point out the mistakes I see most often so you can skip right past them.
Starting with bad artwork kills your results immediately. You cannot make a good embroidery file from a tiny, blurry logo grabbed off a website. Get the best source file you can find .
Not specifying fabric is a classic error. A file digitised for a cap will not work on a polo shirt. Tell your digitizer what you are stitching on .
Skipping the test stitch happens every time. I already warned you about this. Do not do it.
Using the wrong file format sends your machine into confusion. Your BAi needs DST. Make sure that is what you receive .
Expecting perfection from auto-digitize sets you up for disappointment. It is at best a rough draft .
Conclusion: Get That Logo Stitching Today
Converting a logo for your BAi Mirror embroidery machine comes down to two simple choices. Learn to digitize yourself over time, or hire a professional service to handle it now.
For most beginners and busy shop owners, the smart move is outsourcing. You skip the months of practice, the expensive software, and the endless frustration of bad test sews. You send your logo, you get a perfect DST file, and you start stitching professional results immediately .
Choose a service that asks about your fabric and your size. Get one test file made. Sew it out on your actual material. When it looks great, you have found your partner.
Now go convert that logo and let your BAi Mirror do what it does best.
Related Posts

What Are FDA Import Alerts and How Can Businesses Avoid Them?
Introduction International trade in regulated goods such as food products, dietary supplements, cosmetics, pharmaceuticals, medical devices, and animal feed is tightly controlled in the United States. One of the most powerful enforcement tools used by the U.S. Food and Drug Administration is FDA Import Alerts. These alerts are designed to prevent potentially un
Sp5der Hoodie Everything You Need to Know Before Buying
The sp5der hoodie has quickly become one of the most recognizable and in-demand pieces in modern streetwear. Over the past few years, fashion has shifted from simple, minimal designs to bold, expressive clothing that reflects personality and culture. Sp5der hoodies fit perfectly into this trend with their oversized silhouettes, eye-catching spider web graphics,
How to Get the Best Deal from Car Removal Services in Hidden Valley
Let’s be honest—selling an old, damaged, or unwanted car can feel like trying to sell a broken umbrella in the middle of summer. You know it has some value, but finding the right buyer? That’s the tricky part. If you’re considering Car Removal Hidden Valley, you’re already on the right track. These services are designed to make your life easier by off
Comme des Garcons jacket details you should know
When it comes to high-end aesthetic, Comme des Garçons stands out for its bold creativity. unique design language. A Comme des Garçons jacket isn’t just outerwear—it’s a statement piece that definitely reflects individuality and artistic expression. From structured blazers to experimental silhouettes, these jackets redefine modern aesthetic. If you&
Leave a Reply